Template Anatomy
np.Templating templates use a format called Frontmatter, that is commonly found in blogging platforms which utilizes templates to render dynamic content, and is a great fit for the way NotePlan integrates normal note taking features, but infuses a robust calendaring system.
Template Configuration
There are two parts to a NotePlan template. Depending on the type of template you are creating, there will be at least two attributes, and template body.
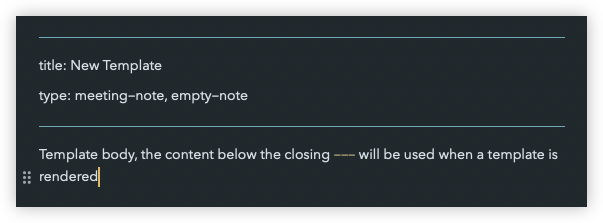
The template must start with three dashes --- followed by template attributes, then three more dashes --- and then the template body, which will be the content that will be rendered when invoking any of the np.Templating commands.
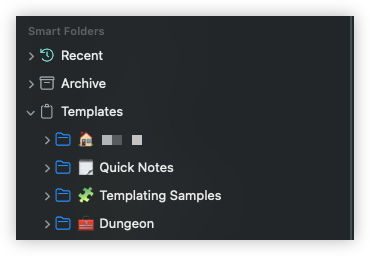
All templates must be placed in the "Templates" folder, which can be found in NotePlan Sidebar, located in the "Smart Folders" section.
Template Sections
There are two sections in a NotePlan template, template attributes and template body.
Template attributes
attributes - The attribute section is between opening --- and closing --- tags, and contains all configuration key/value pairs, separated by colon : character.
REQUIRED ATTRIBUTES
All templates must have at least two required attributes title and type.
| Attribute | Description |
|---|---|
| title | The title attribute is the name of template, and will appear in the Templates folder |
| type | The type attribute determine the type of template, and will control where it is accessible from. |
The following are the the list of possible type values:
| Type | Description |
|---|---|
| empty-note | is a generic note and can be used for anything that will be processed by the various np.Templating commands such as np:new, np:insert, np:append, np:invoke |
| meeting-note | templates will be available when selecting any of the locations associated with meetings (those displayed in NotePlan calendar) |
| quick-note | templates are accessible when invoking the np.Templating quick note command np:qtn |
| template | Used with the <%- include(/** **/) %> tag, used when creating including templates within other templates |
IDENTIFY TEMPLATE FRONTMATTER
NotePlan will display the frontmatter attributes in an alternate tint color
Template body
body - The remainder of template, placed after the second delimiter line--- is the template content and will be use when template is rendered.
Example
---
title: Template title
type: empty-note
---
Everything below the second `---` will be template content

--
created: <%- date.now('dddd MMMM Do, YYYY HH:mm A') %>
--

< -- [[<%- date.yesterday('YYYY-MM-DD') %>]] | [[<%- date.tomorrow('YYYY-MM-DD') %>]] -- >

And the remainder of the template will be display here ...
Template Attribute Processing
When a template is processed, the first portion will be template attributes, where you can use static text, or other np.Templating commands to provide the setup, before moving onto rendering the template body.
REENTRANCE SUPPORT
When np.Templating is rendering a template, it processes in a top-down fashion and uses a process know as "reentrance", which provides the ability to reference any previous attribute values as the basis for the current attribute.
Template Body Processing
After the attributes have been processed, the next pass will process the template body. You can use any of the supported np.Templating modules, or reference any attribute from the processed template attributes.
Example
The following example will perform the following
startDatewill be supplied based on prompt for user to enter start date valueendDatewill use thestartDatevalue from previous attribute, and subtract 7 days, usingaddmethod in Date ModuleformattedDatedemonstrates how to create custom formatting, usingstartDateandendDateattributesIn the template body, you will see how we can use any of these attributes to produce further formatting, etc.
- Template
- Output
---
startDate: <%- prompt('startDate','Enter Date') %>
endDate: <%- date.add(startDate, 7) %>
formattedDate: <%- startDate %> to <%- endDate %>
type: empty-note
---
**Frontmatter Processing**
x
In this example, the following occurs
- The  `startDate` attribute is supplied from user input (prompt)
- The `endDate` attribute is derived by the *DateModule* `add` method, adding 7 days to whatever the user entered
- And finally, the full date is displayed below

#### Date Range
**Start Date:** `<%- startDate %>` *value entered from prompt*
**End Date:** `<%- endDate %>` *calculated adding 7 days to `startDate`*
**Formatted Date:** `<%- formattedDate %>` *calculated   from `startDate` and `endDate`*

## Template Body Processing
In this example, the following occurs
- Create reminder value using `startDate` and `subtract` method

**Reminder:** `<%- date.subtract(startDate, 7) %>`
Frontmatter Processing
In this example, the following occurs
- The
startDateattribute is supplied from user input (prompt) - The
endDateattribute is derived by the DateModuleaddmethod, adding 7 days to whatever the user entered - And finally, the full date is displayed below
Date Range
Start Date: 2022-05-21 value entered from prompt
End Date: 2022-05-28 calculated adding 7 days to startDate
Formatted Date: 2022-05-21 to 2022-05-28 calculated from startDate and endDate
Template Body Processing In this example, the following occurs
- Create reminder value using
startDateandsubtractmethod
Reminder: 2022-05-14